


When I first started hiking, I thought that the stakes and guylines that came with my tent were the only ones I should use. However, I soon realized that I needed flexibility and options to adjust to different terrain, weather, and site locations. For example, on granite, platforms on the Appalachian Trail (AT), snow, wind, or sand require different anchoring methods. There are many ways to accomplish proper tent anchoring, such as using different stake types, additional anchor points, alternative approaches, or a combination of these.
The market offers various types of tents, including free-standing, semi-freestanding, and hiking pole tents. Each manufacturer recommends a minimum number of anchor points, which can range from 4 to 12, as well as optional anchor points for additional support. However, what’s not usually covered is how to adjust your staking and guylines for different terrain. Proper and secure anchor points can make a significant difference in preventing bent or broken stakes, pulled stakes, ensuring a good night’s sleep, and avoiding tent damage.
In this blog, I’ll provide an overview of these methods, along with a few hacks. These ideas come from hiking 300+ days and nights over the last 3 years on the Pacific Crest Trail (PCT), Continental Divide Trail (CDT), and other shorter trails. There are links to the equipment and references from this article at the end.
Longer Adjustable Guylines
When you setup a tent, it’s typical to utilize stakes at each suggested anchor point. However, some tent manufacturers provide a non-adjustable or very short guylines at the anchor points, making it difficult to adjust the tension if there is an obstacle such as a rock or root in the ground. Additionally, existing guylines have a limited ideal range, and moving the stake too much on either side can adversely impact the tent’s stability during a windstorm. Ideally, a solution should offer flexibility to move the stake in or out from the tent anchor point not just side to side.
If your tent has a non-adjustable guyline, there are solutions that can help. One option is to use Nemo Airpins, but my recommendation would be to install an inline tensioner on the guylines. You can easily purchase these inline tensioners on Amazon for $7 for a pack of 12. It is advisable to use plastic tensioners (sometimes called sharktooths or clam cleats) which are shown in the middle image below, on guylines that are permanently attached to avoid tearing the tent when compressed in a pack or sack. Using the tensioners increases the flexibility to place stakes wherever you need them and allow for easy tightening or loosening the guyline without moving the stake.
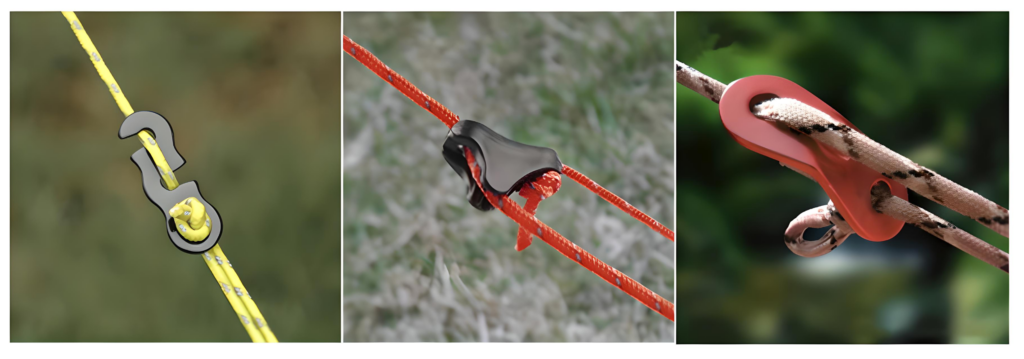
Tent Anchoring : Guyline Tensioners
Reflective and Fluorescent Guylines
Depending on the model and manufacturer of the tent, the thickness, length, and color of the guylines can vary. The narrower 1.8mm guylines are lightweight but may not be as durable. They can break over time, especially in strong winds or when using rock anchors (which will be discussed later). Some guylines are too short and hard to add a tensioner or use with rock anchors. Moreover, some guylines are not bright or do not have a reflective strand, which makes them difficult to spot at night.
To enhance both the performance and safety of your tent, I recommend using thicker 2.5mm guylines that are reflective and fluorescent. It’s also a good idea to have 2-3 additional guylines for optional anchor points. These optional guylines should be longer so that they can be anchored away from the tent. Instead of tying knots to attach to the tent, I suggest using a plastic hook (as shown in the image below in yellow) or a small carabiner as a substitute. You can find multiple guyline options for $6 per 50 feet on Amazon. Additionally, the 2mm Ironwire made with Dyneema from Lawson Equipment is another great upgrade option.
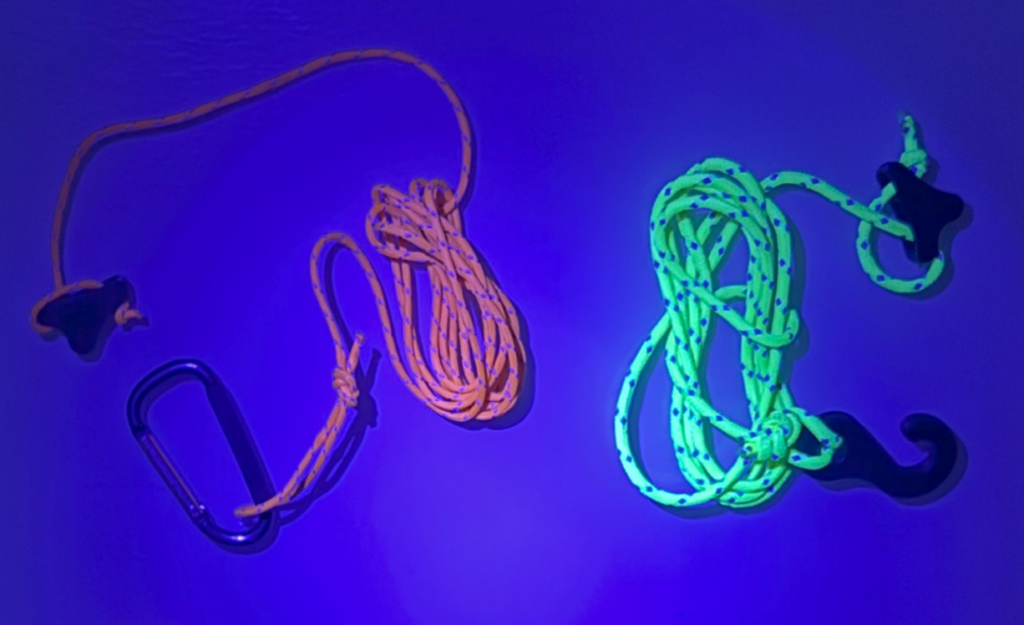
Tent Anchoring : 1.8mm Orange and 2.5 mm Yellow Guylines Under UV Light
Ultraviolet Light (UV)
I always carry a small keychain UV light that weighs only 0.25 oz. This light helps me locate my gear in the dark. To increase visibility, I attach small loops of the reflective and fluorescent guyline to most of my gear, especially the tent stakes. Since these loops are not load-bearing, I use the smaller 1.8mm guyline. In situations where stakes don’t have a hole, I use gel superglue on the loops instead of liquid superglue, as it stays in place better. This saves time while packing up my gear in the dark and is particularly useful if a stake is pulled out in a windstorm at night.
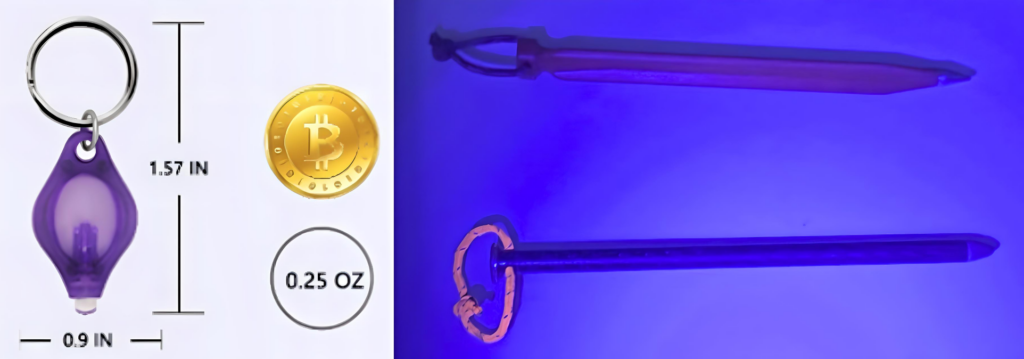
Tent Anchoring : Keychain UV Light and Tenk Stakes with Guyline Loops
Stake Choices
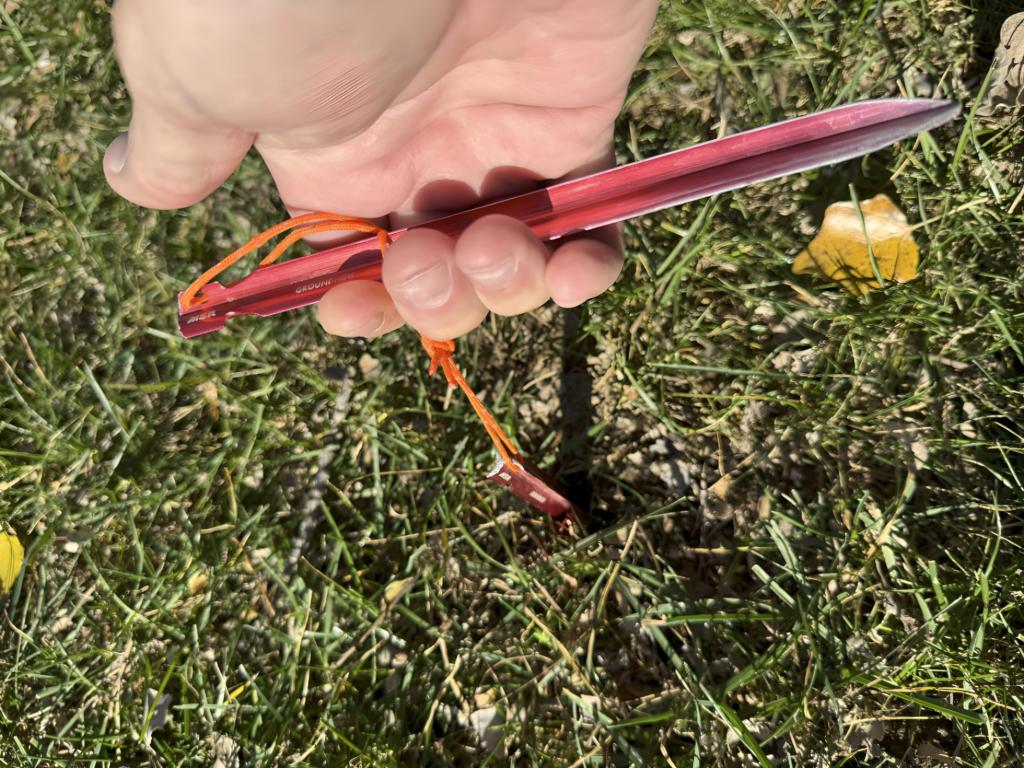
The ideal stakes can vary depending on the type of tent, terrain, ground density, and flatness of the site. For thru-hikers, it’s important to consider the weight and effectiveness of the stake material, which usually includes Aluminum, Titanium, and Carbon Fiber. As a result of these considerations, many different stake designs and materials are available on the market. Common shapes include Hook, Nail/Pin, Y, V, and unique shapes like deck and Nemo Airpins.
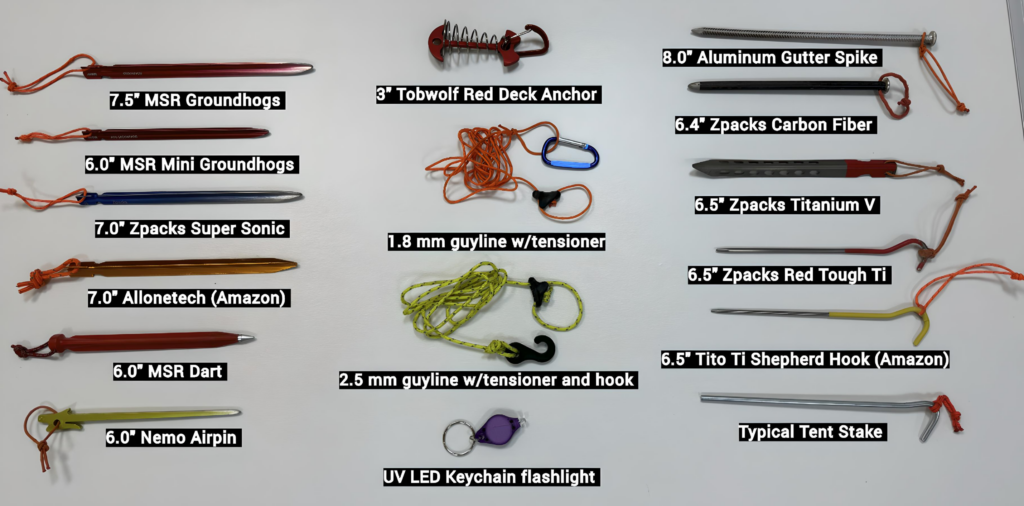
Tent Anchoring : Sample Stakes
The Right Stake
Choosing the right stakes for your tent and trail conditions is crucial. While some tents come with stakes, others offer them as optional accessories. I suggest bringing stakes for all anchor points, and a few extras for any lost or damaged ones. Experienced hikers recommend using 7.5” Y-shaped stakes (like MSR Groundhogs, Zpack Super Sonic, or Amazon generic Y) for the critical anchor points, and smaller Y-shaped stakes (such as MSR Mini Groundhogs) or shepherd hooks (such as Zpacks Red Tough Ti) for the secondary points. Big Agnes offers Dirt Daggers that come in 4 sizes (6”, 6.75”, 7.5”, and 10”) if you need other options.
Stake Position
When it comes to tent stake angle, there is some debate, and can depend on terrain. However, most people agree that longer stakes are better for critical anchor points, which is why the 7.5” length is so popular. My recommendation is to drive the stake straight down or a slight angle if blocked. If it goes in too in easily, you should either reposition or place a decent-sized rock on top. Keep in mind that if it rains, the ground will likely soften, and therefore, a solid hold becomes more important.
My Stake Selection
To allow flexibility, I typically take these stakes and ship others as needed:
- 7.5” Y stakes for critical anchor points (usually 4-6)
- 6.0” Y stakes for the secondary anchor points (varies by tent)
- A few carbon fiber nails or titanium hooks to allow quick and easy disconnection for the doors from inside
Pulling Stakes
To reduce bending or breaking stakes, always attach a loop for easy removal by inserting another stake or stick through the loop. Avoid kicking, instead use a light tap on the side of the stake with a rock should loosen it to pull it out.
Tent Anchoring : Pulling Stake with Another Stake
Staking Alternatives
When it comes to choosing the right stakes for hiking, it’s important to consider the terrain and weather. While the Y, nail, pin, and hook stakes are generally reliable, they may not be effective on AT style platforms, or in areas with rock, sand, or snow terrain.
For AT platforms, a deck anchor with spring is recommended to prevent the anchor from falling between the boards. To ensure a secure attachment of the guyline, a carabiner can be used.
In sand and snow, the best option is to use a dead-man anchor (see image below) with a clover hitch knot in the center of the stake. Another alternative is to place a big rock on top of the stake. If it’s expected to be windy, the same approach as for rocky terrain should be taken.
For rocky terrain, there are three methods that can be used: wrap, t-bone, or little/big rock. All three methods can cause the guyline to fray or break as it rubs against the rock. This is sometimes unavoidable and is important to monitor the guylines. An alternative is add a stake to the tent side to reduce fraying.
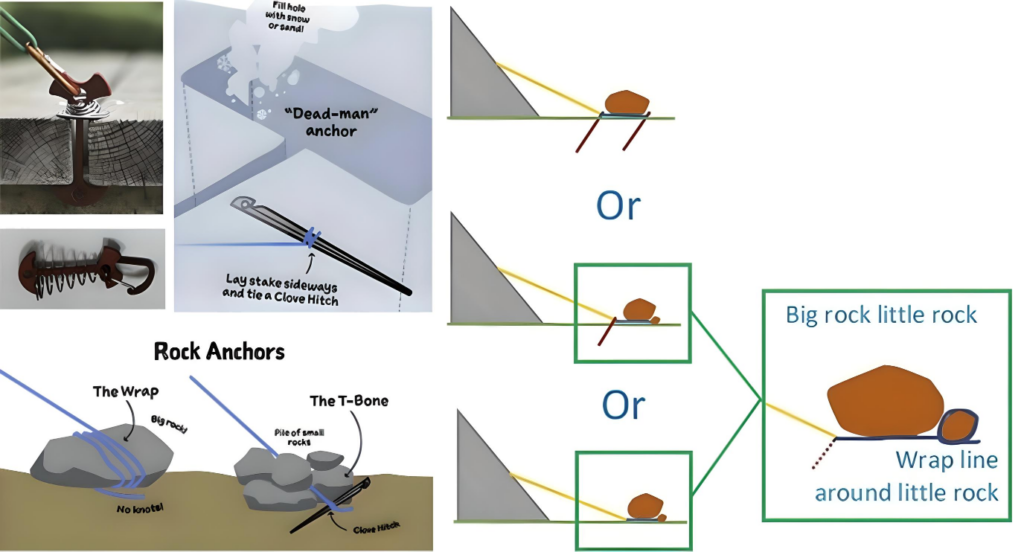
Tent Anchoring : Alternatives (Source “The Ultimate Hang” and “Slower Hiking”)
Final Suggestions/Recommendations
- Use heavier (2.5mm) guyline with a tensioner and extend the length to allow for alternative anchor methods
- Bring a few spare guylines with an inline tensioner and hook for optional anchor points or replacements for existing guylines
- Vary your stake selection for trail conditions
- Bring 2 extra stakes for lost or broken
- Use reflective and fluorescent guylines and add loops to all stakes
- Bring a small UV light
- When uncertain, secure guylines with heavy rocks. Remember to remove rocks from campsite to leave no trace
Links
- 7.5” MSR Groundhog – https://www.msrgear.com/tents/tent-accessories/groundhog-tent-stakes/05807.html
- 6.0” MSR Mini Groundhog – https://www.msrgear.com/tents/tent-accessories/mini-groundhog-stakes/05808.html
- 7.0” Zpacks Super Sonic – https://zpacks.com/products/7-blue-super-sonic-stake
- 7.0” All one tech – https://www.amazon.com/gp/product/B01I0X9UQ8
- 6.0” MSR Dart – discontinued
- 6.0” Nemo Airpin – https://www.nemoequipment.com/collections/all-tent-accessories/products/airpin
- 8.0” Aluminum Gutter Spike/Nail – https://www.homedepot.com/p/Amerimax-Home-Products-8-in-White-Aluminum-Spikes-with-6-in-Ferrules-10-Pack-45044/100097358
- 6.4” Zpacks Carbon Fiber – https://zpacks.com/products/carbon-fiber-stake
- 6.5” Zpacks Ti V – https://zpacks.com/products/titanium-v-stake-w-red-head
- 6.5” Zpacks Red Tough Ti – https://zpacks.com/products/6-5-titanium-hook-stake-w-red-head
- 6.5” Tito Ti Shepherd Hook – https://www.amazon.com/gp/product/B06XQGR9ZB
- 3” Tobwolf Red Deck Anchor – https://www.amazon.com/gp/product/B0C3B4WL8J
- Plastic Tent Guyline Tensioner – https://www.amazon.com/gp/product/B09KR73RTL
- Plastic Tent Guyline Hook – https://www.amazon.com/gp/product/B08KVL7TSF
- UV LED Keychain – https://www.amazon.com/Daemson-Keychain-Flashlight-Portable-Detector/dp/B0CM1F4N2D
- Lawson Equipment Ironwire – https://www.lawsonequipment.com/products/ironwire-high-strength-accessory-cord
- Reflective and Fluorescent Guyline – https://www.amazon.com/gp/product/B07D2CS9KZ/
- Big Agnes Dirt Dagger UL – https://www.bigagnes.com/collections/tent-accessories/products/dirt-dagger-ul-tent-stakes-pack-of-6
- Using Stakes and Snow Anchors – https://theultimatehang.com/2014/09/17/using-stakes-snow-anchors/
- How to Secure Your Tent for Strong Winds and Storms – https://slowerhiking.com/shelter/tents-in-strong-wind-how-to-pitch-your-tent
Closing
I hope you enjoyed this post! I attend most Thru-R Happy Hours (https://thru-r.com/events/) and am very open to discussing this topic. You can also find me in our private member area under the handle @hikermcclure if you’d like to chat more about this subject!
Happy Trails – Just Mike

Such a great post! I may need to change things up myself regarding this subject…
Thanks Just Mike!